Basic strategies to improve tracking results
Use the following basic techniques to improve your tracking results:
Find a good reference pattern
-
Play the footage several times to locate a reference pattern that satisfies as many of the following rules as possible:
Contains perpendicular edges, such as dots, intersections, and corners. Lines and straight boundaries should be avoided.
Is a high-contrast pattern.
Contains smooth or even changes in brightness or color. An example of an uneven color or brightness change is a sharp-edged shadow that passes over your reference pattern.
Appears in every frame of the clip (does not move offscreen or become obscured by other objects).
Is distinct from other patterns in the same neighborhood in the clip.
Manually modify track points
If you’re not satisfied with the location of a track point on a post-analysis motion path, you can drag an individual track point to adjust its position.
-
Position the playhead at the frame you want to modify.
The track point at the playhead position is highlighted.
-
Do one of the following:
Drag the highlighted track point in the Canvas to adjust its position.
Drag in the Tracker Preview area in the Behaviors Inspector.
For fine-tuning, you can zoom in and out of the clip using the Zoom tool. The zoom follows the pointer, so place the pointer on the track point in the Canvas and drag right to zoom in. Drag left to zoom out of the clip. To return to normal view, choose 100% from the Zoom Level pop-up menu (above the right side of the Canvas). If you have a Multi-Touch trackpad, pinch open or closed to zoom in or out, then scroll the zoomed view using two-finger swipes.
You can also adjust a tracking curve in the Keyframe Editor. For more information on using the Keyframe Editor, see Keyframing overview.
Delete bad keyframes in the Keyframe Editor
When an analysis is complete, you might need to retrack a portion of the clip. Rather than tracking over bad tracking keyframes, delete bad keyframes before retracking. If bad keyframes are not deleted, the tracking behavior may continue to use the old reference point.
Position the playhead at the frame where you want to retrack the reference pattern.
-
In the Keyframe Editor, drag to select the keyframes you want to delete.
If the Keyframe Editor is not visible, click the Show/Hide Keyframe Editor button in the bottom-left corner of the Motion project window.

Control-click in the Keyframe Editor, then choose Cut from the shortcut menu (or press Delete).
-
In the Canvas, drag the tracker to the reference point, then click Analyze.
New track keyframes are created.
Tip: When dealing with multiple problem trackers, you can turn off the trackers you’re not correcting to simplify your view in the Keyframe Editor. Additionally, when fine-tuning tracks in the Keyframe Editor, you can simplify what appears in the graph. The following image displays all curves for a simple four-corner pin.
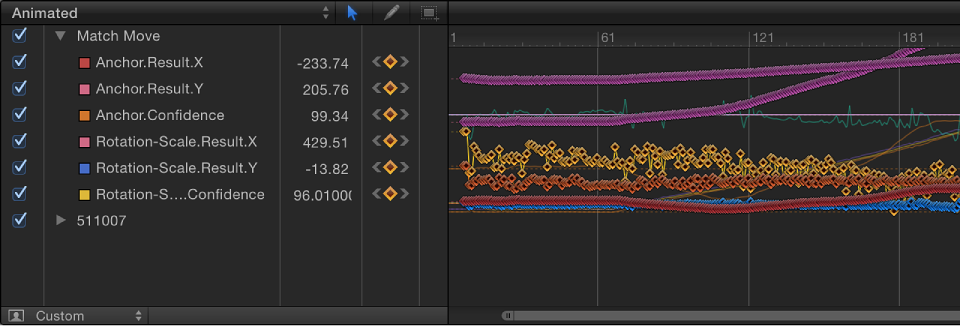
To solo a curve, Option-click the parameter’s checkbox in the Keyframe Editor’s parameter list.

Delete bad track points in the Canvas
You can also delete bad track points in the Canvas, during or after analysis.
Note: Track points in the Canvas correspond to keyframes in the Keyframe Editor.
-
During analysis, press Esc to stop the tracking.
If you’ve already completed the analysis, go to step 2.
In the toolbar, ensure that the Adjust Item tool is selected.
-
Ensure that a track point is active in the Canvas.
You can to zoom into the Canvas to better see the active track points. The track point at the current playhead position appears larger than other track points.

Note: If you press Delete when a track point is not selected, the entire path is deleted.
-
Do one of the following:
Press Delete to delete the track point at the current position of the playhead.
-
Move the playhead to the frame where you want to begin deleting track points, and press Delete.
Each press of the Delete key removes one track point. Only active track points are deleted.
Tip: The direction in which track points are deleted is determined by the Reverse checkbox in the Behavior Inspector. When Reverse is deselected, each track point you delete moves the playhead toward the beginning of the clip. When Reverse is selected, each track point you delete moves the playhead toward the end of the clip.
Ask Motion for a hint
You can have Motion display suggested tracking points. You need at least one tracker in the Canvas to display suggested tracking reference points.
-
Press the Option key, place the pointer over a tracker in the Canvas, then hold down the mouse button.
The suggested reference points appear in the Canvas on the footage and in the magnified inset as small red crosshairs.

When you move a tracker toward a suggested point, the tracker snaps to the point. The suggested points are not necessarily ideal tracking reference points for the feature you want to track in the clip. Motion is merely picking locations in the current frame that meet the reference pattern criteria, such as an area of high contrast.

Remove interlacing (fields) from a clip before tracking
-
Select the footage in the Media list of the Project pane, then choose an option from the Field Order pop-up menu in the Media pane of the Inspector.
Note: Interlacing can be present in clips stabilized using the automatic analysis mode in the Stabilize behavior.
Perform multiple stabilization analyses on a shaky clip
If a clip is particularly shaky, it may be necessary to stabilize the clip more than once to remove camera movement not corrected in the first stabilization analysis.
-
Stabilize a clip, export the clip, import the clip, then stabilize the clip again.
For more information, see Improve stabilization.
Sharpen a clip’s reference area
A sharp, high-contrast pattern can provide a good tracking reference area. You may be able to sharpen the reference pattern of a clip by applying any filter to a clip before tracking. The tracker analyzes the clip, but not the result of a filter applied to the clip.
Apply the Sharpen filter to the clip and adjust its parameters in the Filters Inspector.
Export the clip, reimport the clip into your project, then delete or disable the original (exported) clip.
Perform your tracking operation again.
Because the tracker analyzes the clip, not the result of a filter applied to the clip, the clip must be exported and reimported to your project.